|
|
Post by kliff on Sept 23, 2009 17:34:51 GMT -5
Without calling no names, started a 50c head today too.... man those are some little valves..... The intake weighed... 12.75gr the exhaust weighed... 9.08gr but after a little time on the lathe, and a flexible shaft Dremel, and a pot full o'bits and polishing rubbers... intake down to> 11.95 exhaust down to> 8.8 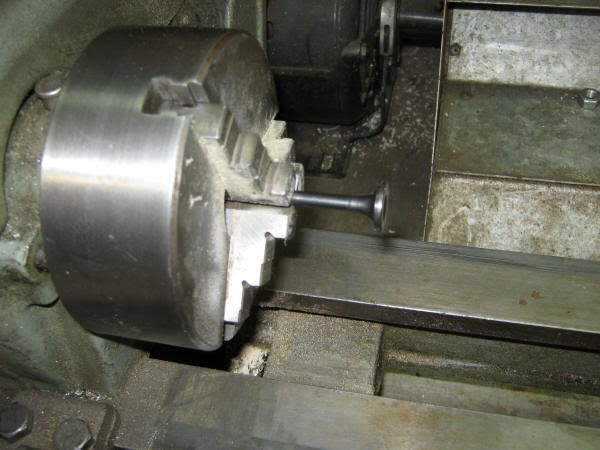 I dropped about a gram off the intake, and about three quarters off the exhaust. Not to mention a purty little swirl polish, to move along the intake charge. 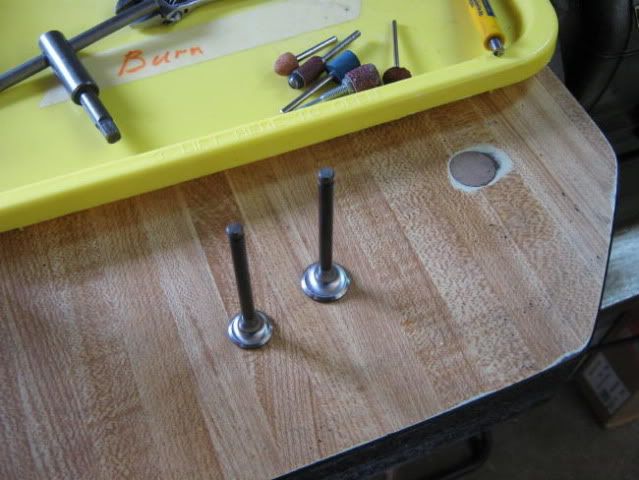 The port shaping on this is gonna be controversial to some, and make perfect logic to others, as I'm going for a larger port VOLUME, and depending on higher RPMs for velocity. This engine is gonna work better at higher RPMs, with a 72ccc or LARGER displacement, with a carn in the 21-24 mm size as it will be port matched to a 150cc manifold. This will be one screaming little beasty!  |
|
|
|
Post by Rebel on Sept 23, 2009 19:13:16 GMT -5
you mean your are not going to put valve seats in that head from a 150 and use the 150 valves?  ? |
|
shiftless
Non-Com
 SFC Indy, IN, 2nd DIV, So. Symperthisers
Twist n Go !
SFC Indy, IN, 2nd DIV, So. Symperthisers
Twist n Go !
Posts: 177
|
Post by shiftless on Sept 23, 2009 21:56:44 GMT -5
Nice
|
|
|
|
Post by Enviromoto on Sept 23, 2009 22:36:00 GMT -5
So Kliff maybe sometime this winter I could come down when your working and just watch ok?
|
|
shiftless
Non-Com
SFC Indy, IN, 2nd DIV, So. Symperthisers
Twist n Go !
Posts: 177
|
Post by shiftless on Sept 24, 2009 9:40:55 GMT -5
Damn nice work
|
|
|
|
Post by kliff on Oct 2, 2009 19:16:27 GMT -5
Been working on this little head for a few days....well over a week, off and on now. A little ole skool, a little improvising....I think it's owner will be pleased. Got a carb that goes with it to finish, but it all should be headed home next week. It's owner should be receiving a little "make up" tool prototype present tomorrow, anyway... But ya know....I just can't STAND these "stepped" ports on 50cc heads... Let's make a sleeve that will press in, much like a valve seal, give a good uniform port size, and even a ring to seal the head pipe with either a bead of 10ga copper wire, or an NCY style flat gasket, between the header flange and the new steel port, which protrudes about .010"    Yeah......ported right out through the steel insert(press fit, .0035 interferance, w/head @ 400F), and check out those dished valves...carbon will have a hard time affixing itself to those puppies! Port polishing.....my opinion, is good to some extent. I just like shaping, and contouring, with a far amout of "smoothing" thrown in. Hell they ain't the best in the world, no doubt, but it's a process that has served me well for 40+ years. I hope some of my work makes y'all happy, and performs up to expectations. |
|
|
|
Post by Rebel on Oct 2, 2009 23:36:48 GMT -5
I certainly enjoy seeing the work you do posted on here. Thanks.
|
|
|
|
Post by rapidjim on Oct 3, 2009 7:59:28 GMT -5
Great job Kliff!!!!!!!!!~!!!!!!!!!!.
Reminds me of back in day when port matching and polishing was mandantory for every built engine. Now you are doing it to scooters. Hope you get the results you are after.
In the words of BeetleJuice; IIIIIIIIIIIIIIIIIIIIIIIIIIIIIIIIIII like it!
Jim
|
|
|
|
Post by 90GTVert on Oct 3, 2009 16:16:15 GMT -5
Great work as usual Kliff. I spent many hours porting a 49cc head myself. It turned out pretty nice, until I knicked the exhaust valve seat with a dremel. It wasn't terrible so I thought I could get away with it if I lapped the valves. I was wrong and I burnt the exhaust valve. I tossed the head in the trash after finding no sources for valve seats.  It did make more power and reach speeds that it only did going down hills before the port work. So, how do you protect the seats when you are doing port work? I thought I'd be fine, but one split second slip ruined my day. R.I.P. 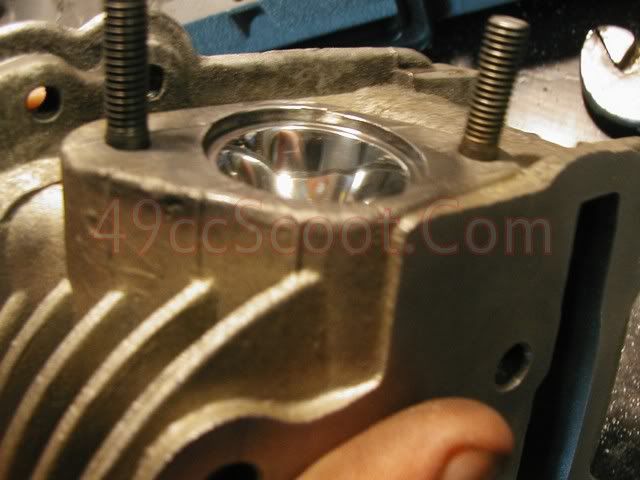 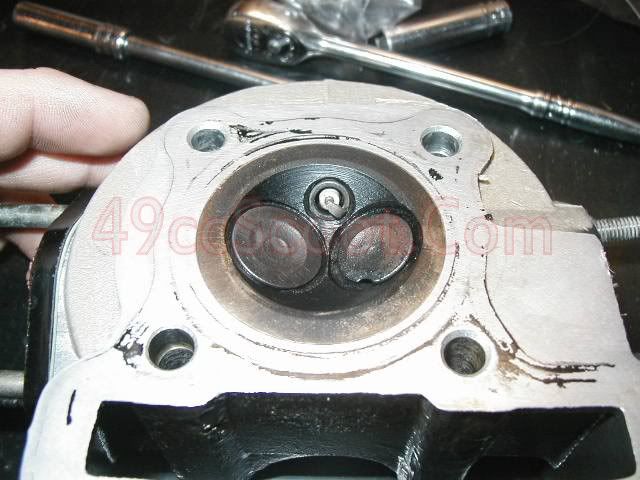 |
|
|
|
Post by kliff on Oct 4, 2009 11:02:34 GMT -5
Great work as usual Kliff. I spent many hours porting a 49cc head myself. It turned out pretty nice, until I knicked the exhaust valve seat with a dremel. It wasn't terrible so I thought I could get away with it if I lapped the valves. I was wrong and I burnt the exhaust valve. I tossed the head in the trash after finding no sources for valve seats. It did make more power and reach speeds that it only did going down hills before the port work. So, how do you protect the seats when you are doing port work? I thought I'd be fine, but one split second slip ruined my day. R.I.P. Hopy Crapola.....man that port looks like a mirror! Too old and shaky for that these days. YOU need to go back to porting and polishing, I need to go back to sweeping the floors  As for the seats, I just take my chances like everyone else I know of. And wheter I touch a seat or not during the process, I always "touch 'em up" just a tad, with my Neway cutter, before hand lapping....  That's my inurance, whether I touch a seat or not. That's a pick of this same head....gittin' tetched up a bit.....LOL! |
|
|
|
Post by 90GTVert on Oct 4, 2009 15:31:57 GMT -5
So, I probably coulda fixed it? Son of a... There was a lot of time in that head, especially going all the way to 2000 grit on the exhaust port and then buffing. I've never spent that sorta time on a port/polish job before. I just thought the seats had to be replaced.  |
|
|
|
Post by kliff on Oct 4, 2009 17:02:37 GMT -5
So, I probably coulda fixed it? Son of a... There was a lot of time in that head, especially going all the way to 2000 grit on the exhaust port and then buffing. I've never spent that sorta time on a port/polish job before. I just thought the seats had to be replaced. Naaahhhh, seats can be re-cut, or re-ground. If you want to replace them, Briggs & Stratton was a good supplyer years ago, when kart racing. I was always going bigger anyway, so I made an adjustable fly cutter, and after popping the pold seat out, machined thoe blocks also to a .0035" press in fit, with heat. About 325F measureed by temp crayons, available at the time in increments all the way up to 600F, helpful when welding aluminum, with a torch....but I digress. The briggs stellite seats worked well with pump, or racing gas as well as alcohol. I made some brass and phosphorus bronze seats, for intake/alcohol only use, and had great luck with them, all the way down to a .012" seat width. Working with that Briggs stuff, in the early days, about all you could find was an insert style connecting rod, some pistons, and ignitions. I even made my own valves, turning the stems of Kohler, Briggs 12HP, even VW down to .252", and working the head of the valve to the tulip shape I wanted, made some Phophor bronze 1/8" wall valve guides, instead of the paper thin sleeves they used... Those were some fun days on small engines too, cut my own cam profiles....protatypes all by hand, on that same little Craftsman Atlas lathe you see in some of these pics, shaped lobes with a mill file, then sent them out to be duplicated on a machine....till I got my own....long sense sold, dammit! PS....uhhhh sorry to say it, but yeah, it could've been fixed at just about any lawn mower shop, or metric cycle shop. |
|
|
|
Post by 90GTVert on Oct 4, 2009 18:00:17 GMT -5
Impressive. Some of the folks into Briggs engines do some wild stuff. My machinist builds all sorts of custom parts for his Briggs pulling tractors. I shoulda just took the head to him, but I'm so used to negative opinions of chinese scoots (not from him though) that I figured he wouldn't wanna mess with it since I thought he had to find seats somehow. Oh well. At least I had the head on long enough to report that port work really does help on these little things. I'm still wondering if valve size might be a bottleneck. I'll see when I get my new head in with 21mm intake and 19mm exhaust valves. The bad part is that it has a huge combustion chamber compared to the stock 49cc head so I'll be checking piston to valve clearance and then getting some milling done. When I checked with the 50cc head I had around 0.170" of clearance so I'm pretty sure I can get a bit of milling done. I'm more worried about the limitations of the cam chain tensioner and I was told that milling will affect cam timing. As long as the chain is tight, I would think any changes would be very minimal? I dunno, I'm used to the small 4 stroke pitbike engines and decent big bore kits for them increased compression rather than lowered it like some of the scooter parts out there so I never had naything milled for 'em.
|
|
|
|
Post by kliff on Oct 4, 2009 18:16:50 GMT -5
Bunches of room for experimentation, improvisation, and above all...ALTERATION.... I'm looking at the possibilities of straightenning out the intake and exhaust ports both from 5-10 degrees, even if I have to angle them over to the side, to miss the floor of the valve spring pocket. But abgled over, may even be better for combustion chamber swirl, and a faster more efficient flame front, especially if angle in, from opposite sides of the head.....say cam chain side for the exhaust to exit, 15 degree off center from now, and up 10 degrees, the intake 15 degfrees off from center on the flywheel side, but about 5 degrees up......
Hmmmmmmm..... this could get real interesting this winter, guess I better start saving for a TIG rig.
|
|
|
|
Post by 90GTVert on Oct 4, 2009 19:04:40 GMT -5
Wow. Sounds like a lot of work to say the least.
|
|


 ?
?


 It did make more power and reach speeds that it only did going down hills before the port work. So, how do you protect the seats when you are doing port work? I thought I'd be fine, but one split second slip ruined my day.


